Desk Lamp For Plants
2016-01-02 10:25:45
My daughter wanted to grow orchids in her room, but we have generally found that they don't thrive with the lighting available in the house. With Christmas coming up I decided to surprise her and put together a desk lamp for growing orchids.
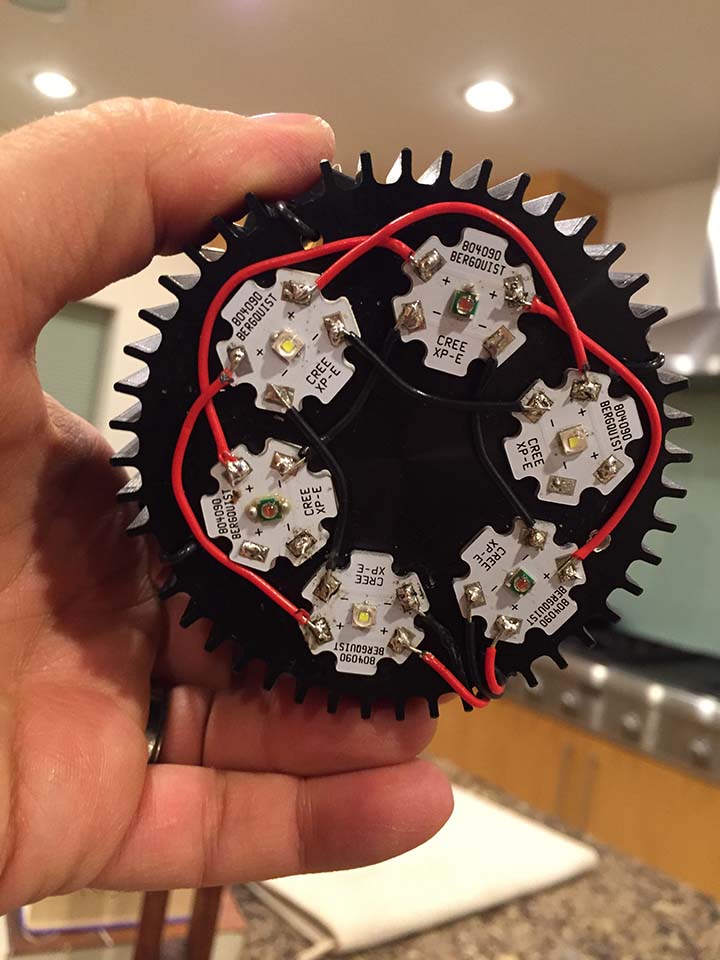
I wanted low power consumption so I went with leds. I did some research and really liked the cree XP-E line of leds since they offered good wavelengths for plant growth. I went with mixing red and cool white since it should give me much of the spectrum that I had wanted and should look pretty natural as well.
http://www.mouser.com/new/cree/cree-horticultural-lighting/
I ended up selecting the following bulbs
- 3 - High Power LEDs - Single Color Red, 650-670nm XLamp XP-E LED (Manufacturer Part #:XPEPHR-L1-0000-00801, Manufacturer: Cree, Inc.)
- 3 - High Power LEDs - White White, 122lm (Manufacturer Part #:XPEBWT-L1-0000-00FE1, Manufacturer: Cree, Inc.)
The problem is that these bulbs are tiny surface mount bulbs which I couldn't work with directly. I did some research and found some pcbs that I could attach them to. I found some instructions on the web and decided to try to do my first surface mount soldering using a hot plate a hot air gun and soldering paste. The parts are way tiny to work with, but I was able to read the polarity sign on the bulb and got all 6 bulbs working with a quick test of my bench top power supply.
Here is the PCB that I used
PCB For single cree xp-e leds (Manufacturer Part #:804090, Manufacturer: Bergquist Company)
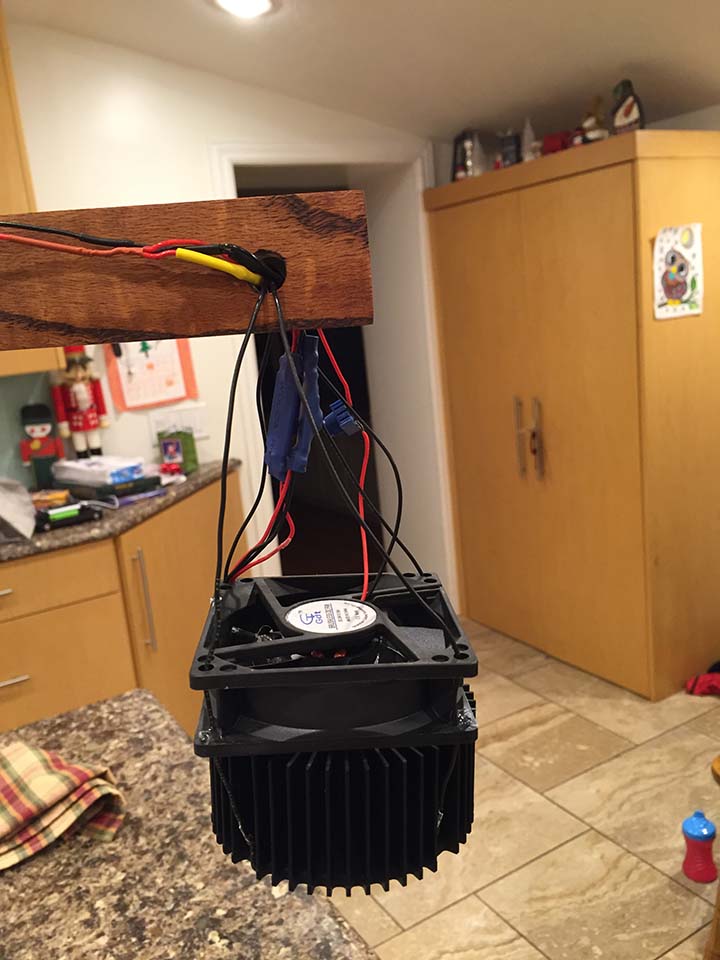
Next I needed a heat sink to attach them to. I wanted something that would look pretty nice and ended up with the following.
Heat Sinks - LED Heat Sink for LMH02 (Manufacturer Part #:LMH020-HS00-0000-0000001,Manufacturer:Cree, Inc.)
I attached the stars to the heat sink using thermal stickers for the purpose
STAR BOARD THERMAL INTERFACE PAD
I ended up soldering the wires to star pads after I had attached them which was less than ideal. The heat sink sucked the heat so fast it was hard to get it hot enough to solder. I eventually got it up and running.
Next I needed to think of how I wanted to drive these leds. I needed a constant current led driver and looked at a lot of them. I finally decided on the FemtoBuck led driver. I initially planed on only using one since from the specs it should be able to handle all 6 bulbs. The problem that I ran into was that the driver would run either the red bulbs or the white bulbs, but not both. I'm pretty new to electronics and did some reading, but didn't come to an answer on why that I was satisfied with. I think that it has to do with the difference in the forward voltage of the bulbs. I ended up buying two drivers and running the red and white bulbs on their own curcuit.
2- Sparkfun FemtoBuck LED Driver
Next I need a power supply and since I was using a buck led driver and at the time thought that I would be driving a series of 6 bulbs I went with a AC to DC 24 volt 3 amp power supply. I also bought a female dc barrel jack to connect my light to the power supply.
I wanted to make sure that it stayed cool enough so I got a 24 volt fan as well. After running it for a while I'm not sure that this was actually needed, but it definitely will stay cool now.
24V 2pin 80mm 8cm 8025S 80x80x25mm DC Cooling Cooler Exhaust Fan
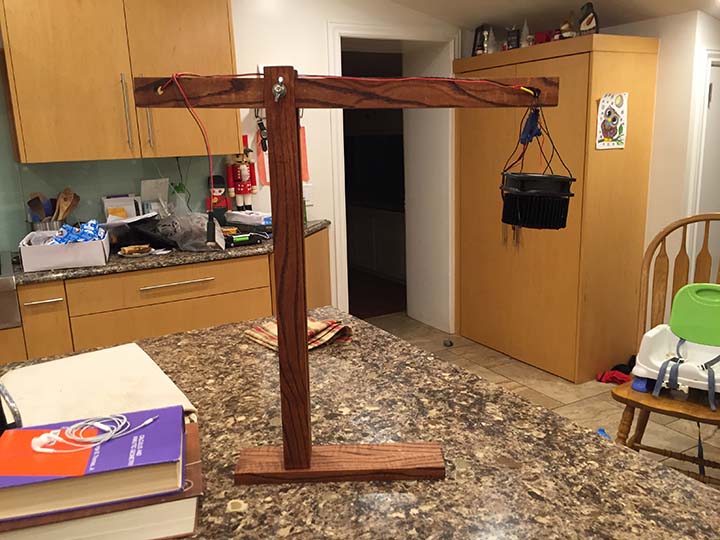
Lastly I needed a lamp stand for this light. I looked a lot for different types of lamp stands and came across a catapult lamp stand on several sites.
http://www.custommade.com/modern-catapult-wood-desk-lamp/by/scandalaskandesign/
This stand fit into my limited skillset for wood working and limited supplies of woodworking tools.
I was able to by a 8' piece of oak (I believe that it was 1"by 2") some stain and a bolt and a wing nut.
I cut and glued two pieces together for the base and cut and glued two long pieces and a short one for the main pole.
I cut the last piece for the arm and once the glue was dry I drilled the holes and sanded it smooth and applied the stain.
once the stand was ready I soldered the light to the stand with some wire and tried it out. Overall I was pretty pleased with it. The lights looked good and I am happy with how the stand came together. I did tweak it a bit since I thought that the fan was spinning too fast and wired a potentiometer to it so that I could adjust its speed. I also realized that I forgot to put a switch on the lamp to turn it on and off and have ordered one, but will have to put it on after Christmas when the parts get here. I'm also considering putting some optic lenses on the bulbs and may decide to make a dimmer at some point. I'm excited to see if my daughter likes it.